> ## Documentation Index
> Fetch the complete documentation index at: https://docs.budecosystem.com/llms.txt
> Use this file to discover all available pages before exploring further.
# Reference Architectures
> Availability tiers (T0–T4) with per-tier topology diagrams and a bare-minimum hardware BOM for each
## Two independent axes — pick each separately
A deployment is defined by **two orthogonal choices**. Conflating them is the most
common sizing mistake:
The **failure domain you survive** — node → zone → region. This is what the
tiers below set, and it drives your SLA. It changes *topology*, not capacity.
How many users/requests you serve. This sizes **CPU, memory, disk, replicas,
and shards** — *within* any tier. The platform and inference layers scale
independently (see [Hardware Requirements](/developer-docs/hardware-requirements)).
The per-tier user counts below are **typical pairings, not caps**. 10,000 users
doesn't *force* T4 — you go to T4 to survive a **region** outage, not to hold more
users. Need 10,000 users but single-region resilience is acceptable? Run a **T2/T3
topology sized for 10,000**. Pick the tier for failure domains; size for concurrency
separately.
## The tier ladder
| Tier | Survives | Target SLA | Typical concurrency | Status |
| ------------------- | ----------- | ------------ | ------------------- | ---------------------------------------------- |
| **T0** Single-Node | pod restart | \~99% | \~100 | dev / PoC only — **no backup** |
| **T1** Essential | disk loss | \~99.5% | \~100 | available |
| **T2** Standard HA | any node | 99.9% | \~1,000 | available (chart default) |
| **T3** Multi-AZ | zone loss | 99.95–99.99% | few thousand | aspirational (multi-AZ is an IaC change) |
| **T4** Multi-Region | region loss | 99.99%+ | 10,000+ | aspirational (second region is operator-built) |
## Per-tier reference architectures
**AI-in-a-Box — dev / PoC only.** Every component on one node. No HA and **no
backup by design** — data is disposable (RPO unbounded). Use only where outage
*and* potential data loss are acceptable.
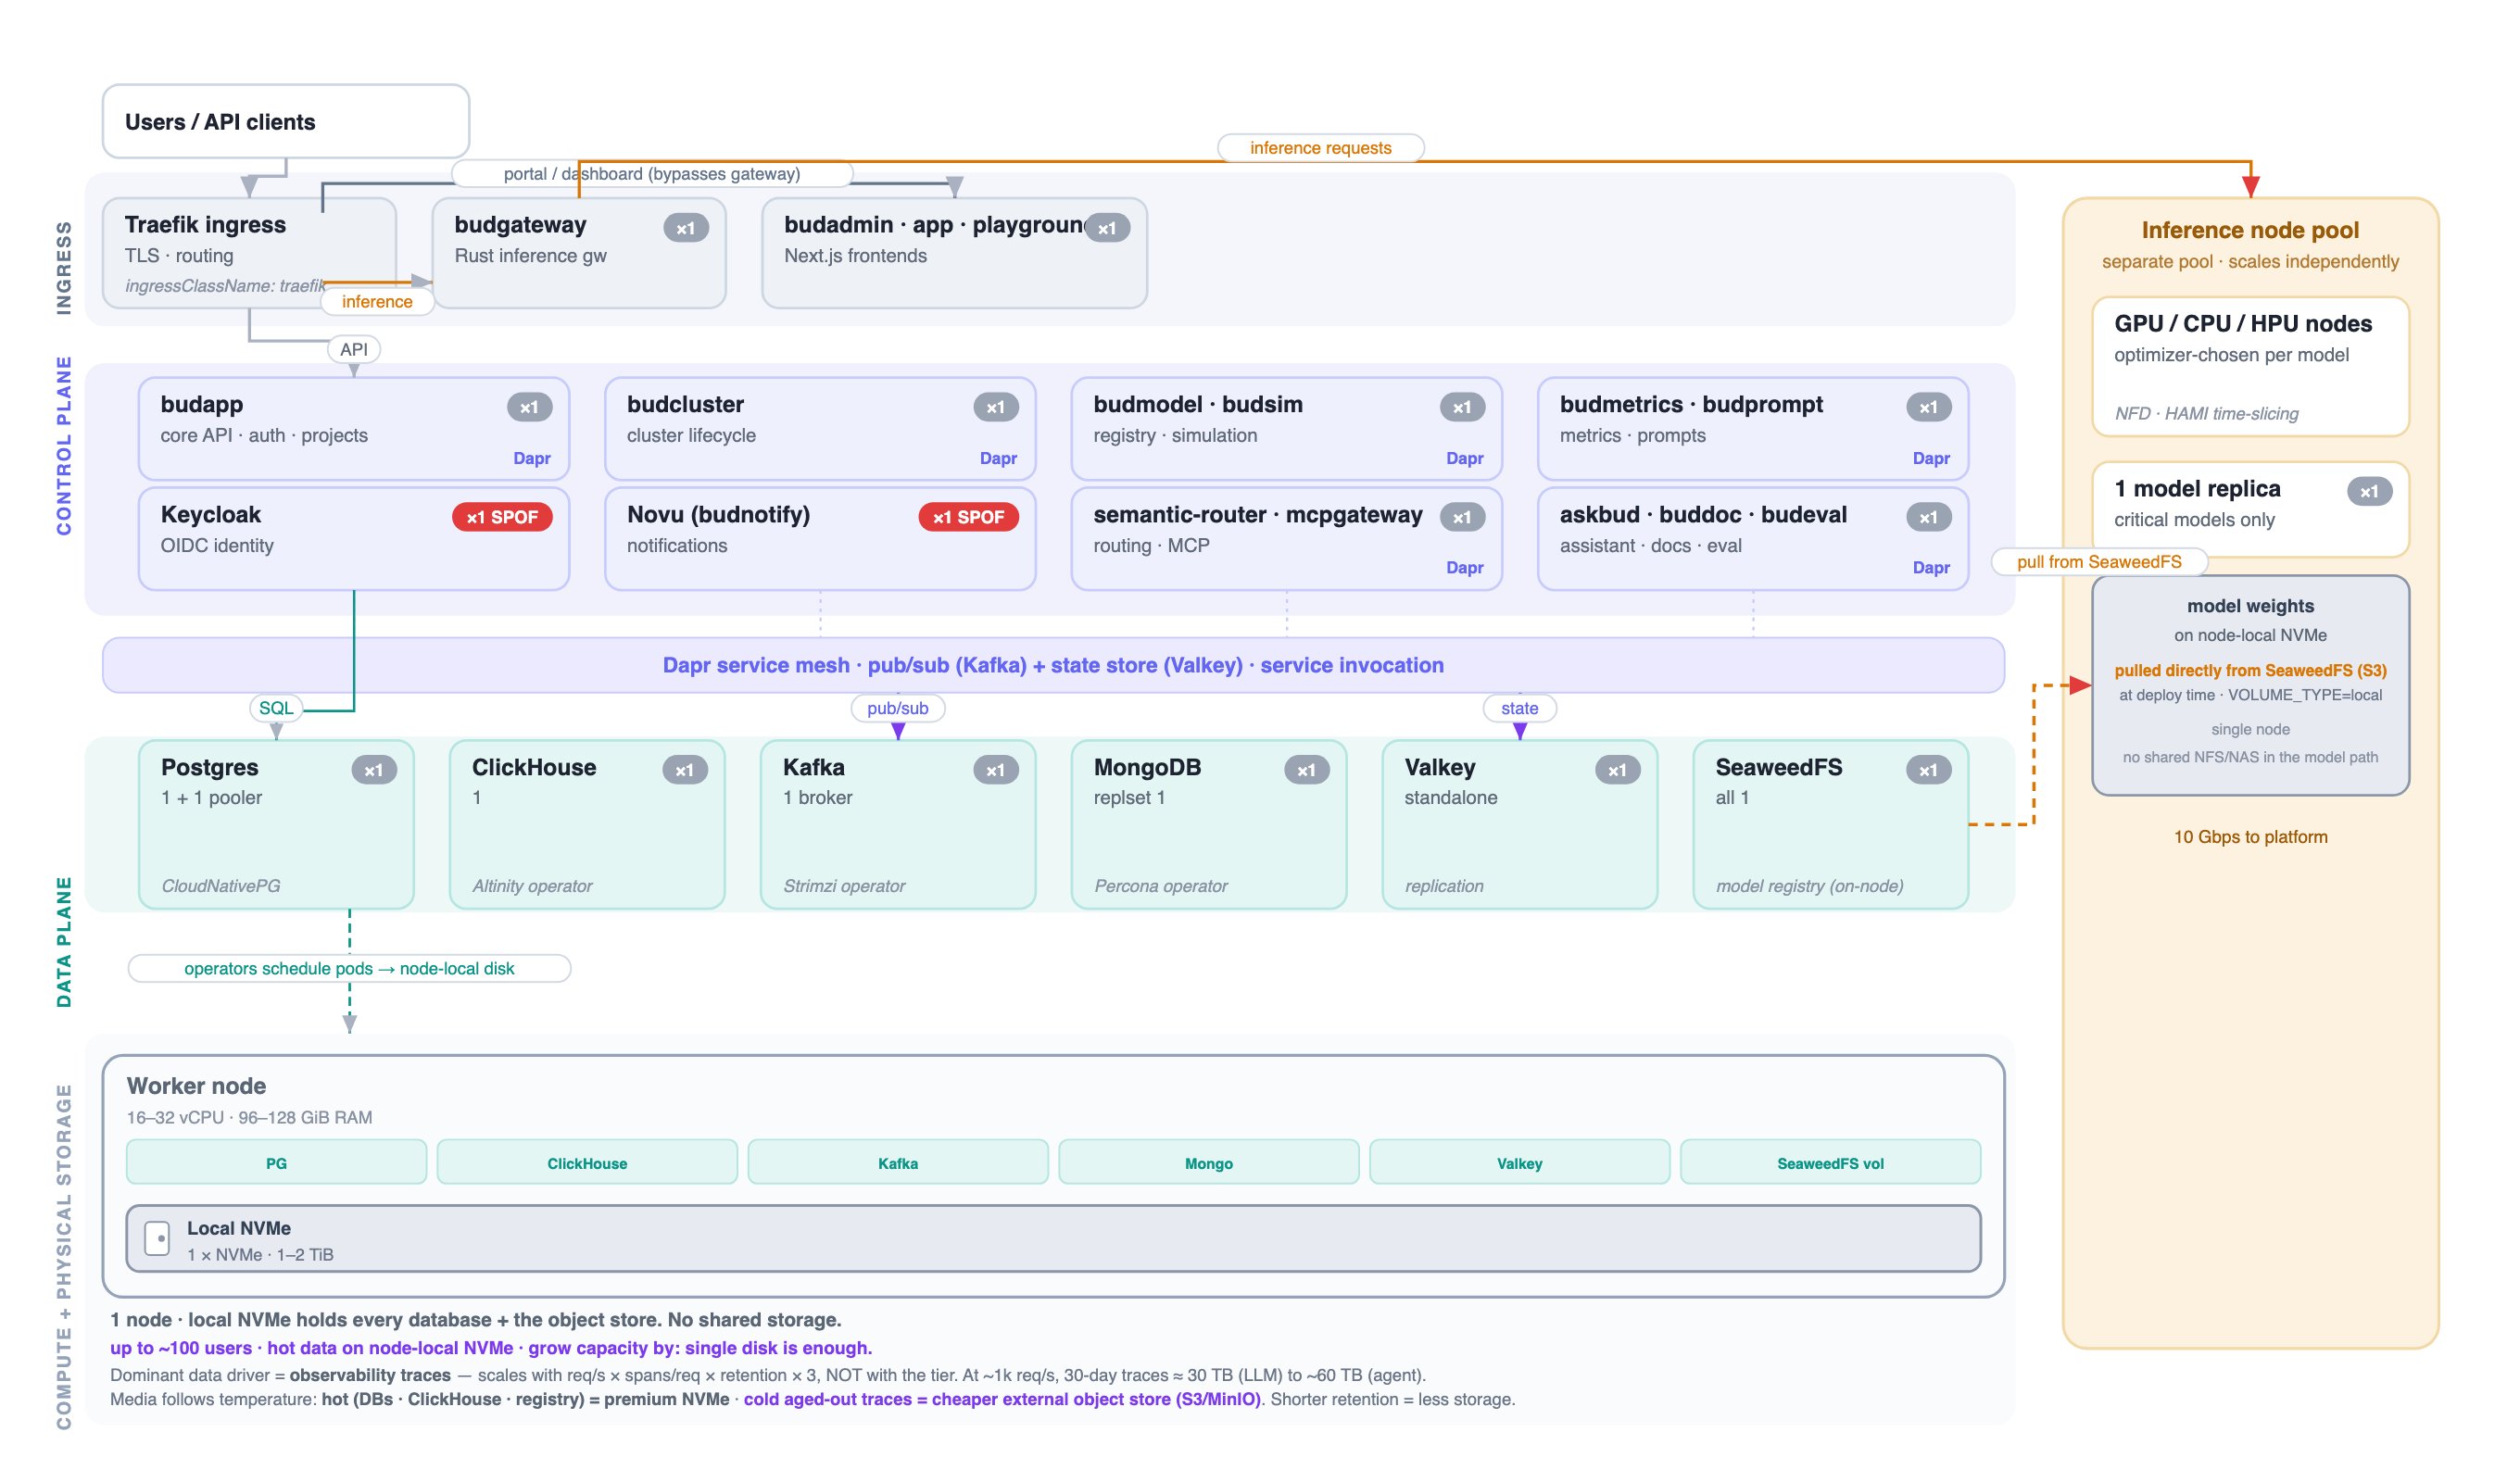 | Resource | Bare minimum |
| ------------ | ------------------------------------------------------ |
| Nodes | 1 |
| CPU / memory | 16–32 cores / 96–128 GiB |
| Node NVMe | 1–2 TiB (holds every DB + the object store) |
| Backup | none |
| Install | `-f values.minimal.yaml` on every dependency (1× each) |
**Single control plane + durable data.** Still one copy of the platform, but
stateful data is backed up **off-site** (Velero → external bucket). You can lose
the box, not the data. Durability comes from scheduled backups, not redundancy.
| Resource | Bare minimum |
| ------------ | ------------------------------------------------------ |
| Nodes | 1 |
| CPU / memory | 16–32 cores / 96–128 GiB |
| Node NVMe | 1–2 TiB (holds every DB + the object store) |
| Backup | none |
| Install | `-f values.minimal.yaml` on every dependency (1× each) |
**Single control plane + durable data.** Still one copy of the platform, but
stateful data is backed up **off-site** (Velero → external bucket). You can lose
the box, not the data. Durability comes from scheduled backups, not redundancy.
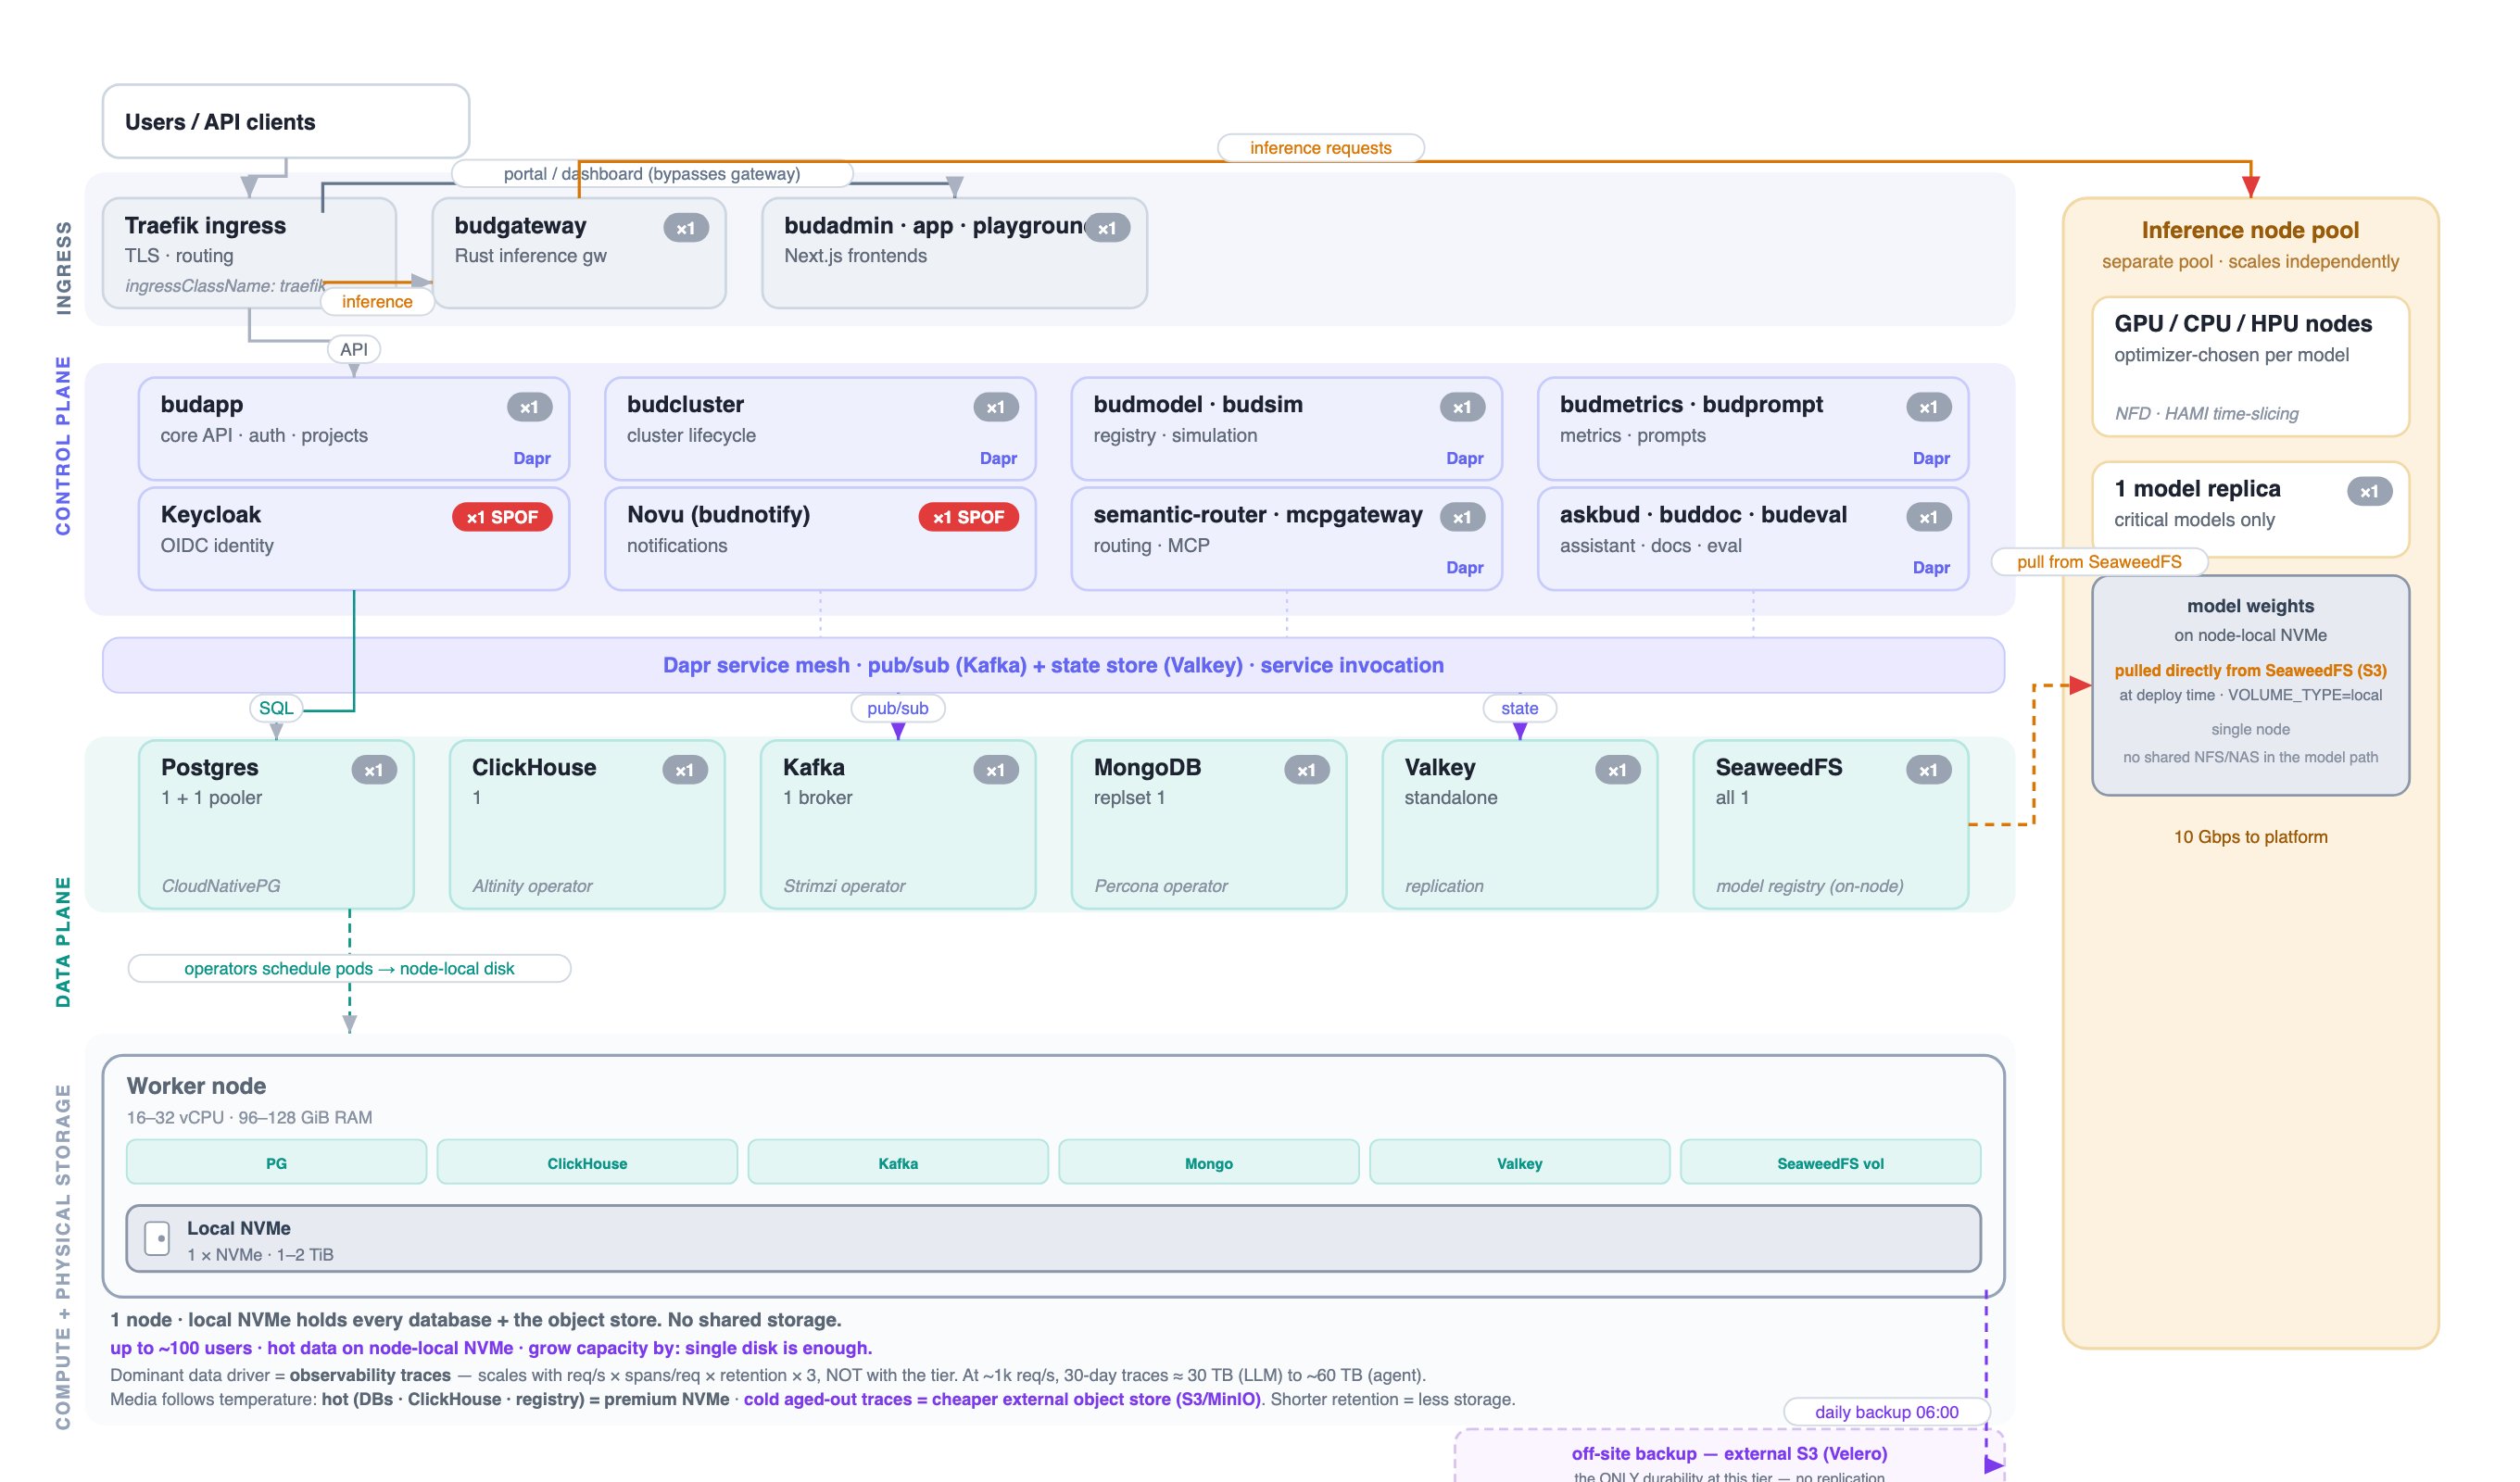 | Resource | Bare minimum |
| ---------------- | ----------------------------------------------------------------------------------------- |
| Nodes | 1 |
| CPU / memory | 16–32 cores / 96–128 GiB |
| Node NVMe | 1–2 TiB |
| Backup | **Velero daily → off-site bucket** (RPO ≤ 24 h) |
| Required actions | Enable Velero + PG WAL + Mongo backup (**all off by default**) and **validate a restore** |
**The default production target.** Three-node cluster; the whole data tier runs
at **3× quorum** with automatic failover. Survives any single node with
seconds-scale RTO.
| Resource | Bare minimum |
| ---------------- | ----------------------------------------------------------------------------------------- |
| Nodes | 1 |
| CPU / memory | 16–32 cores / 96–128 GiB |
| Node NVMe | 1–2 TiB |
| Backup | **Velero daily → off-site bucket** (RPO ≤ 24 h) |
| Required actions | Enable Velero + PG WAL + Mongo backup (**all off by default**) and **validate a restore** |
**The default production target.** Three-node cluster; the whole data tier runs
at **3× quorum** with automatic failover. Survives any single node with
seconds-scale RTO.
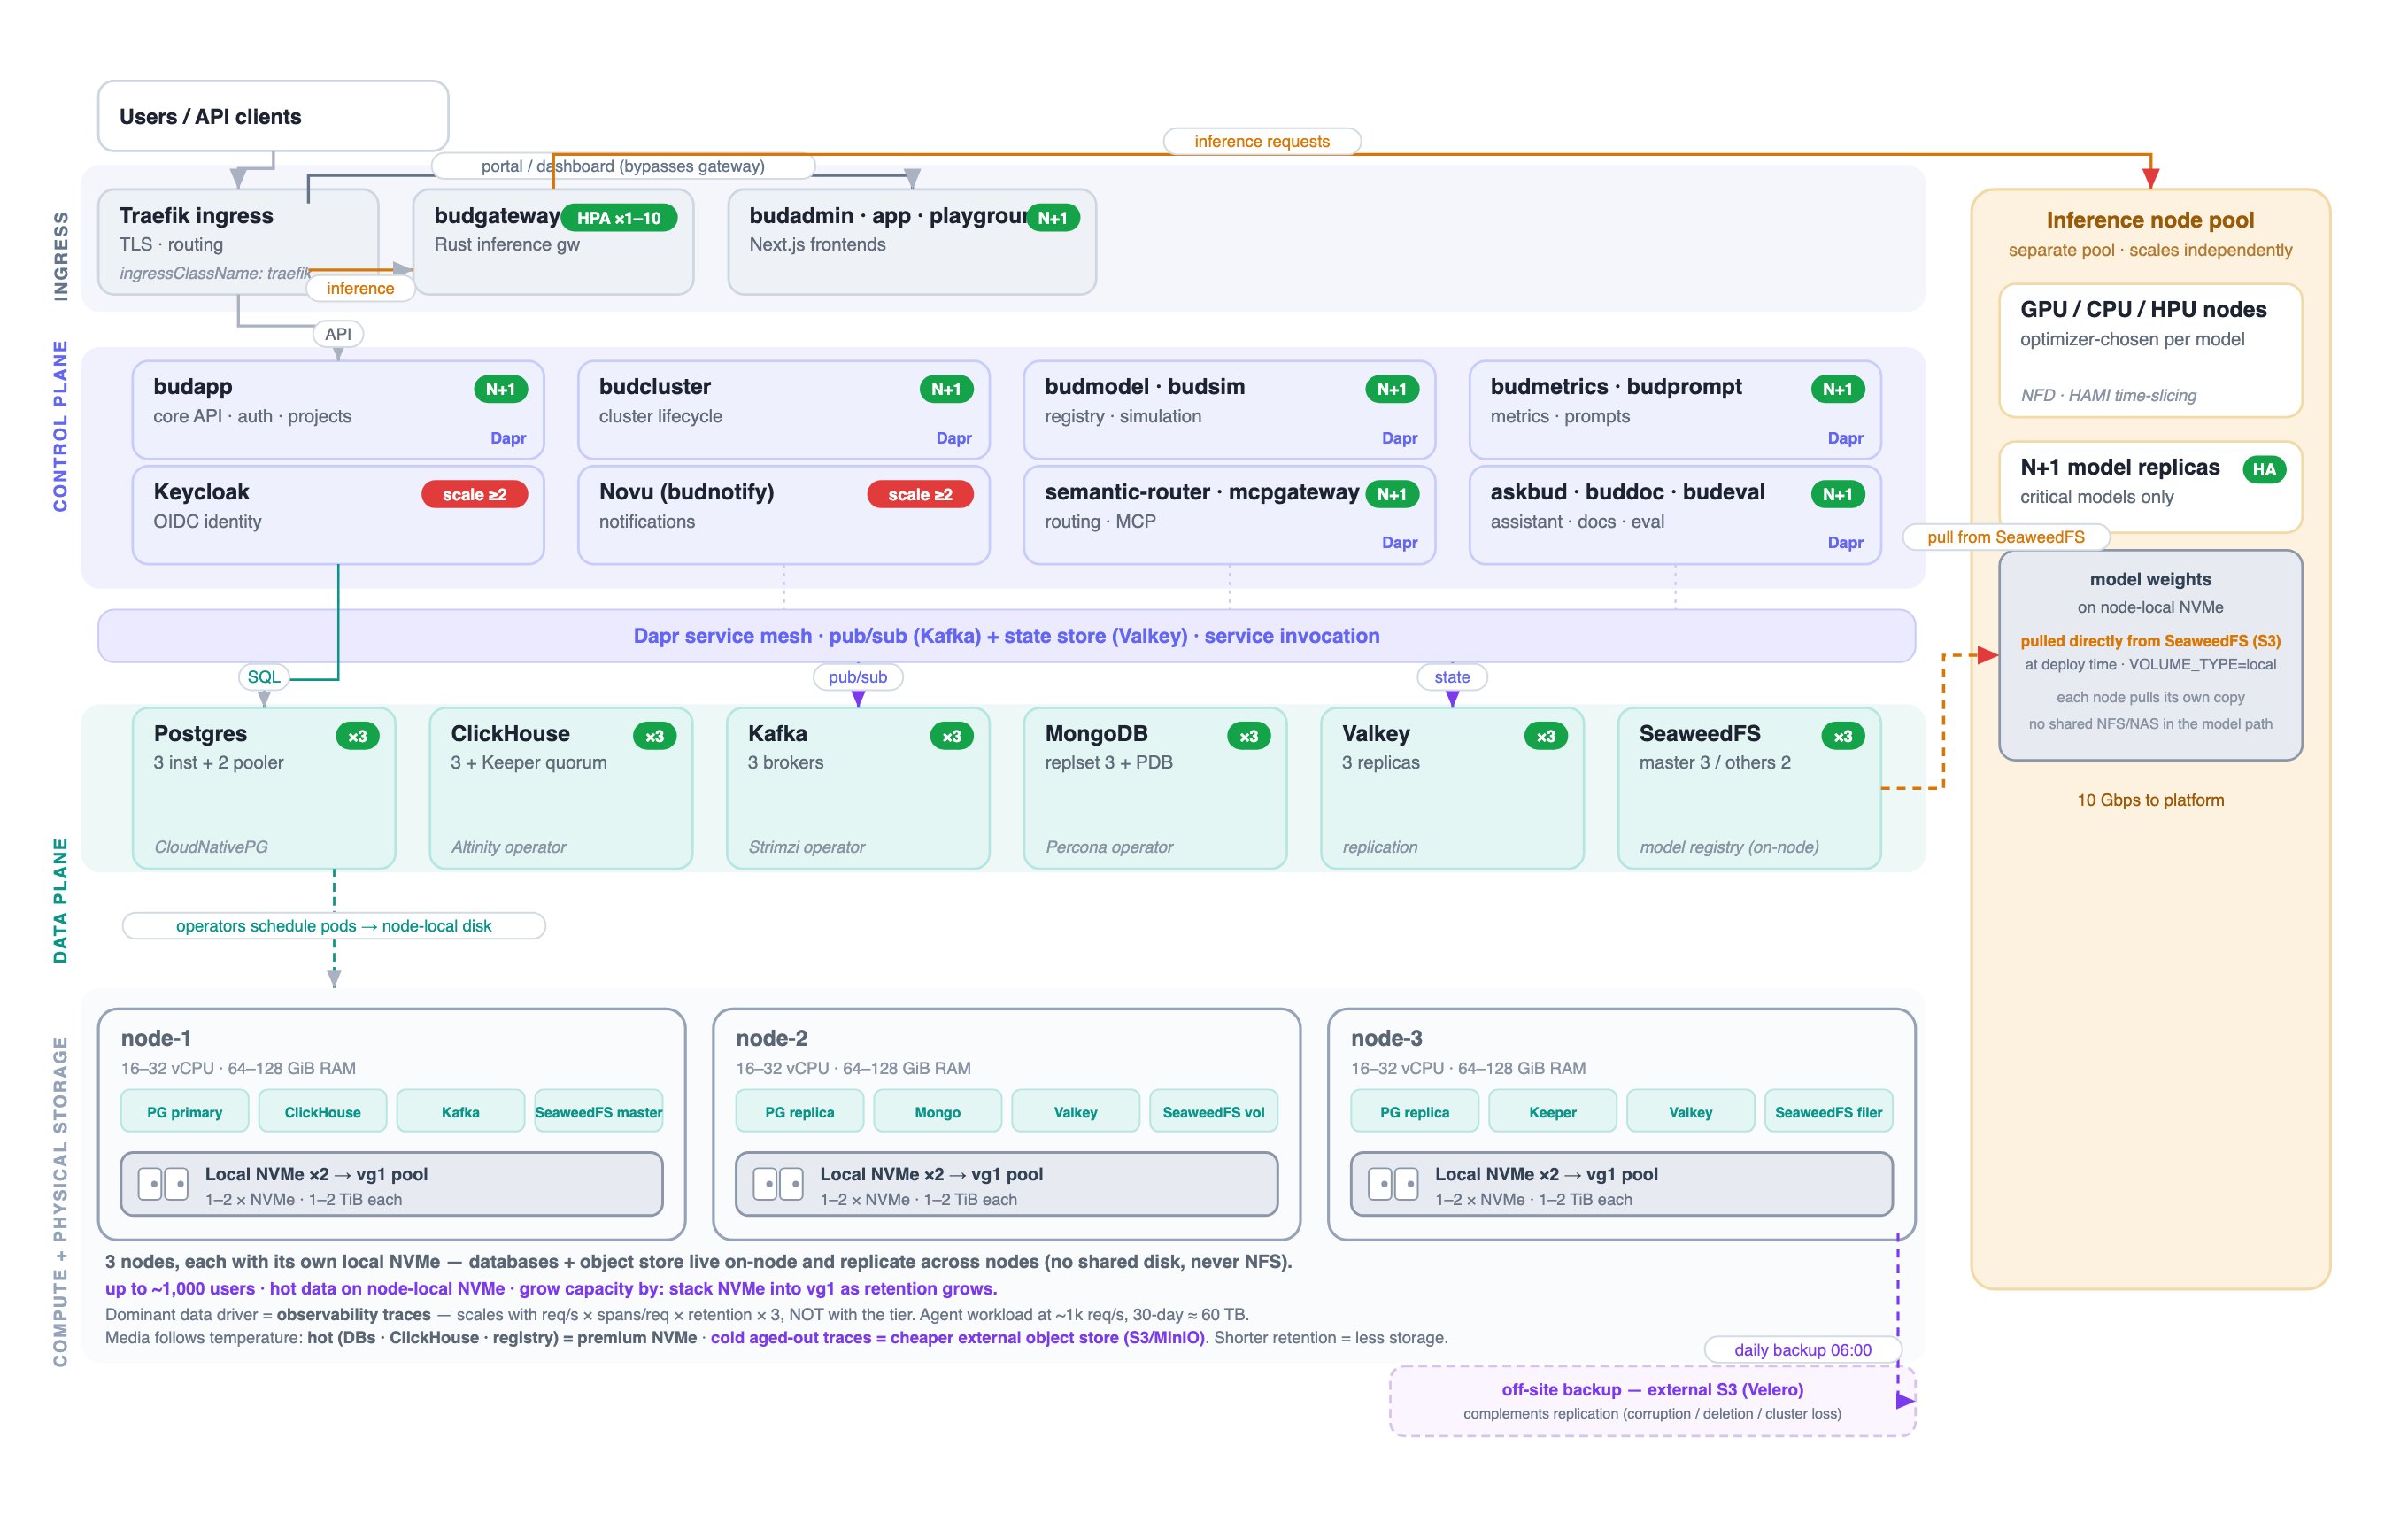 | Resource | Bare minimum (\~1,000 concurrency) |
| ------------ | ---------------------------------------------------------------------- |
| Nodes | 3 |
| CPU / memory | 72–144 vCPU / 192–384 GiB total |
| Node NVMe | **\~5–6 TiB per node** = DB working set + registry share + trace share |
| Object store | in-cluster SeaweedFS (on-node) — no external store needed |
| Backup | Velero + DB-native → off-site bucket |
HA protects against **infrastructure failure** (a node dies, quorum continues).
It does **not** protect against corruption, deletion, or whole-cluster loss —
replication copies those to all 3 replicas. That's what backups (T1) and DR
(T3+) are for. Production needs both.
**High availability across zones.** The same 3-node HA cluster, spread across
**3 availability zones**. Survives a full zone/rack/room outage. Same compute as
T2 at the same concurrency — the tier only relocates the nodes.
| Resource | Bare minimum (\~1,000 concurrency) |
| ------------ | ---------------------------------------------------------------------- |
| Nodes | 3 |
| CPU / memory | 72–144 vCPU / 192–384 GiB total |
| Node NVMe | **\~5–6 TiB per node** = DB working set + registry share + trace share |
| Object store | in-cluster SeaweedFS (on-node) — no external store needed |
| Backup | Velero + DB-native → off-site bucket |
HA protects against **infrastructure failure** (a node dies, quorum continues).
It does **not** protect against corruption, deletion, or whole-cluster loss —
replication copies those to all 3 replicas. That's what backups (T1) and DR
(T3+) are for. Production needs both.
**High availability across zones.** The same 3-node HA cluster, spread across
**3 availability zones**. Survives a full zone/rack/room outage. Same compute as
T2 at the same concurrency — the tier only relocates the nodes.
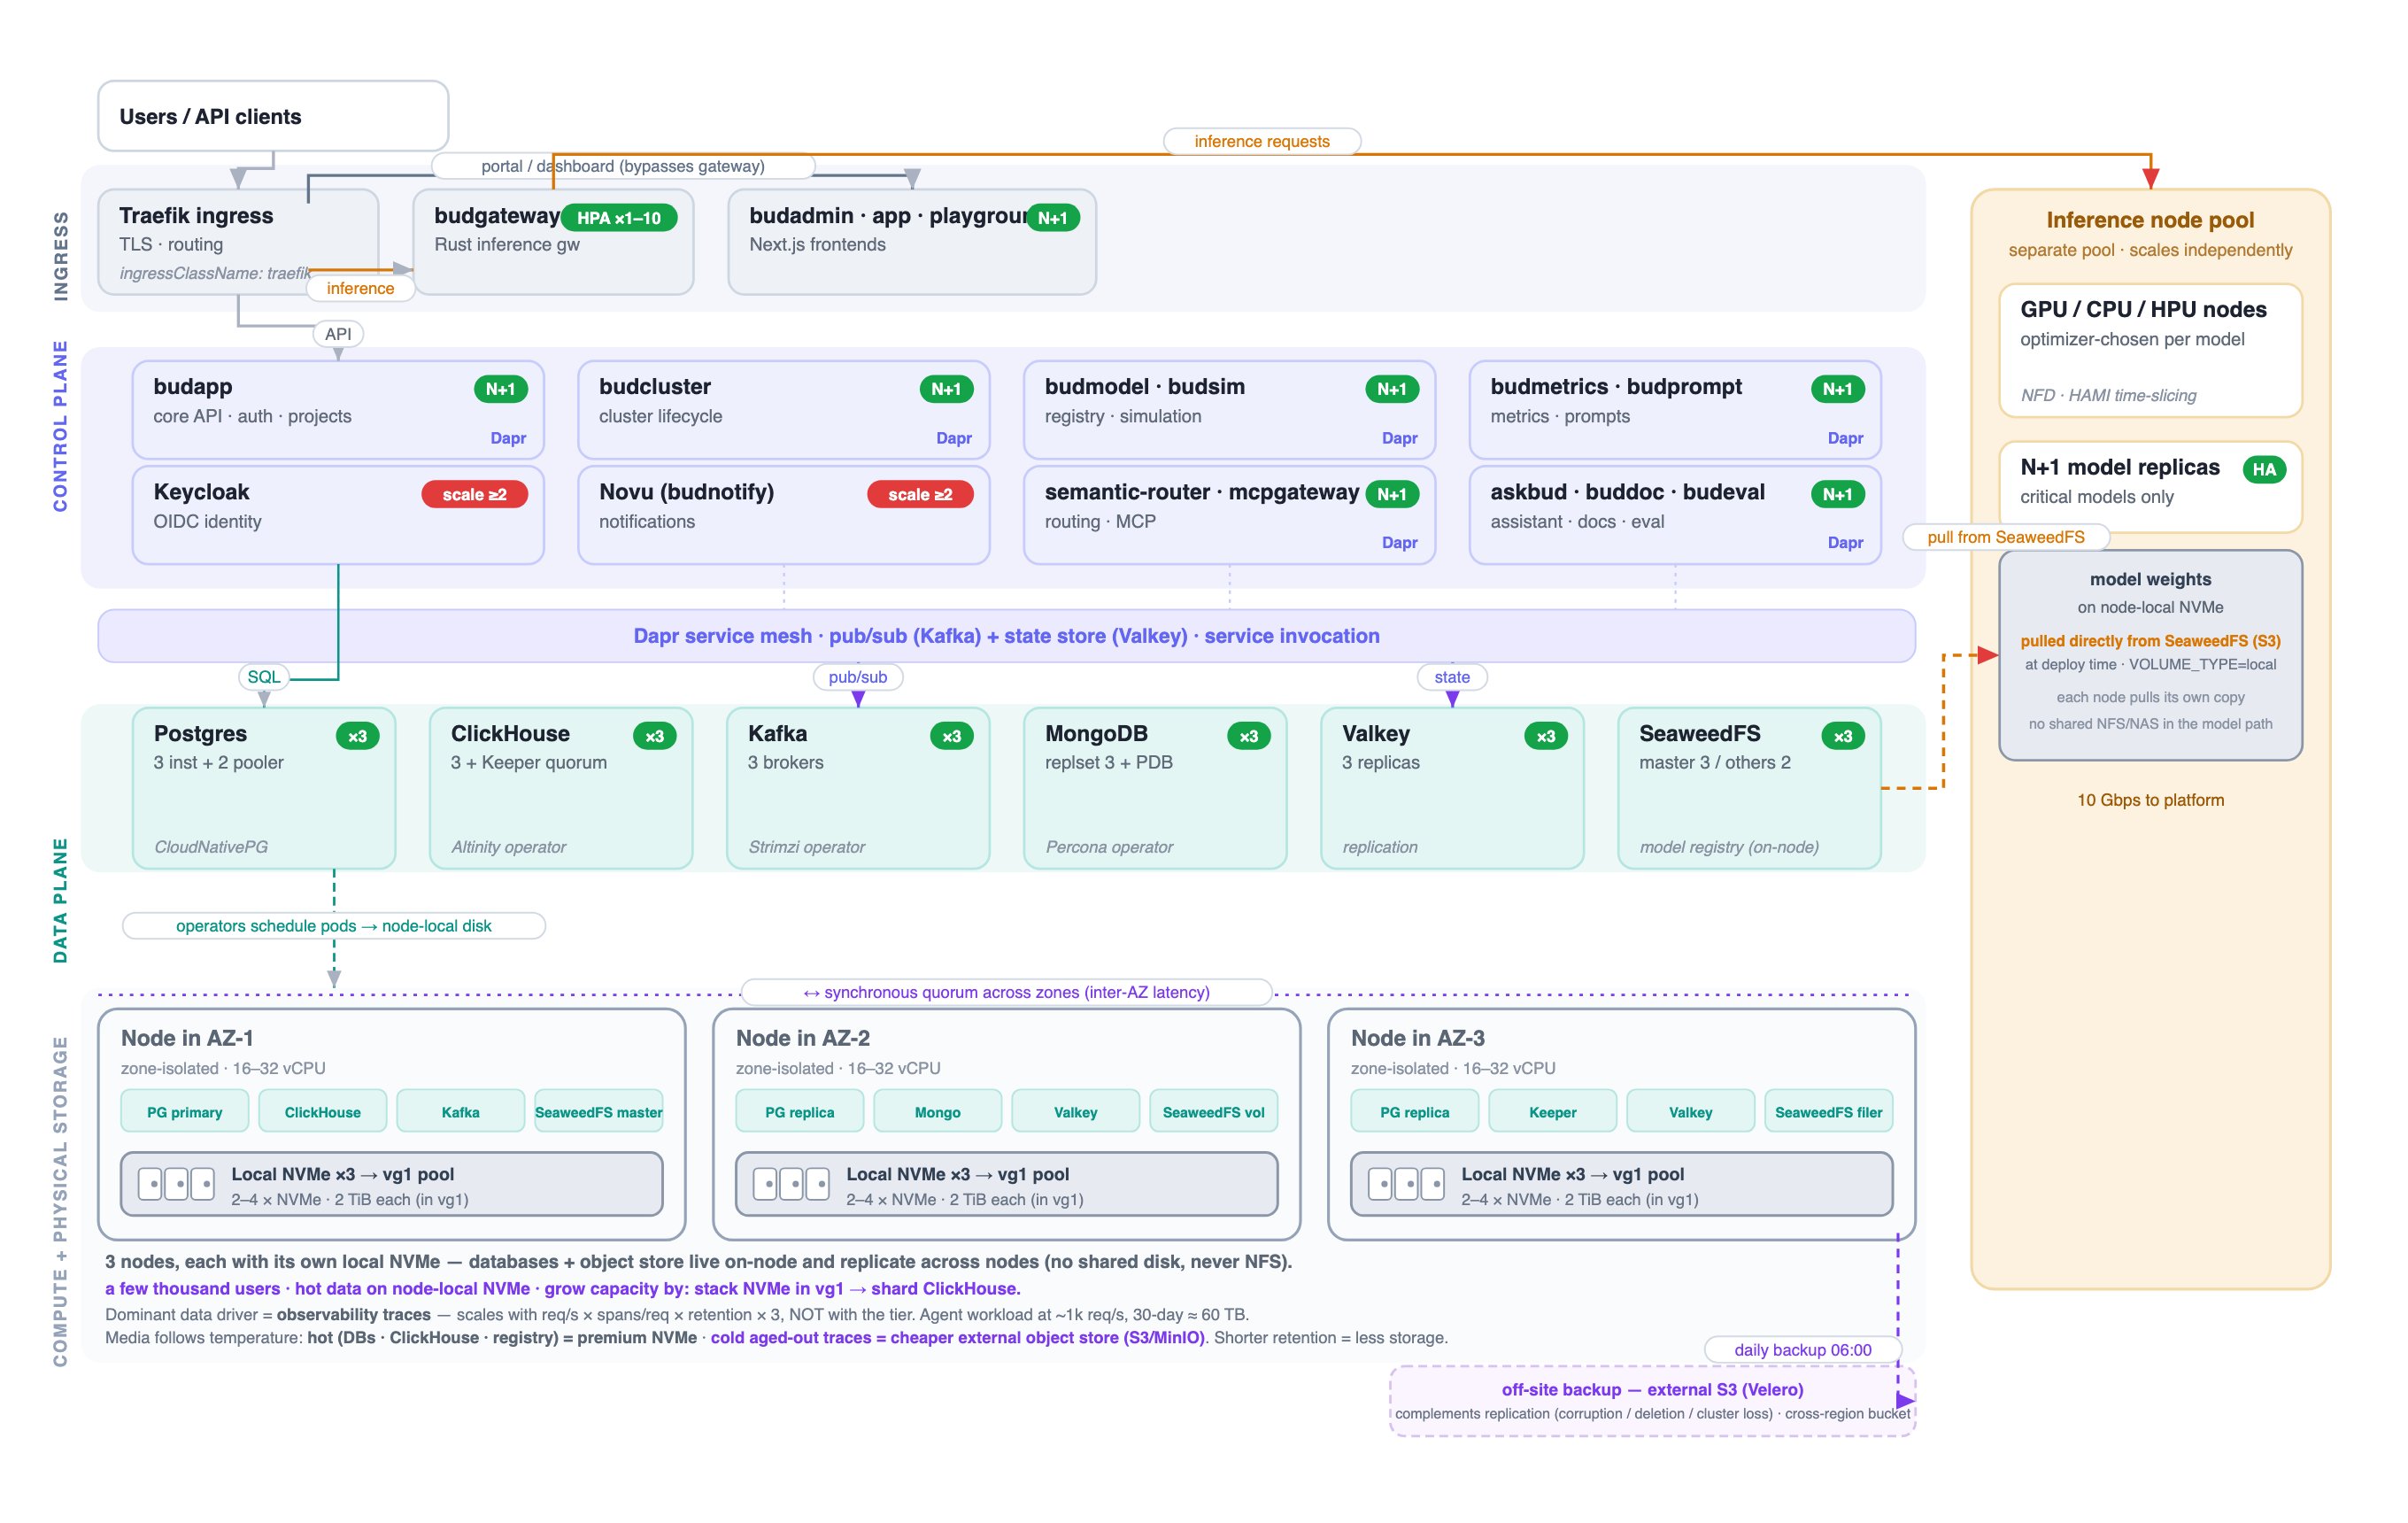 | Resource | Bare minimum (\~3,000 concurrency, interpolated) |
| --------------- | ------------------------------------------------------------------------------------------- |
| Nodes | 3 (one per AZ) |
| CPU / memory | 72–144 vCPU / 192–384 GiB (same as T2) |
| Node NVMe | **\~12–14 TiB per node** (bigger NVMe, still 3 nodes) — or 14-day hot window + cold tiering |
| Object store | optional external MinIO for cold traces (\~15 TB raw) |
| Changes over T2 | multi-AZ node pool · `topologySpreadConstraints` by zone · offsite Velero |
`openebs-lvm` is **node-local** — a volume can't move zones. Quorum survives an
AZ loss, but synchronous cross-AZ replication carries inter-zone latency. Keep
zones in one low-latency region (≥10 Gbps), or relax Postgres to async and accept
a small RPO.
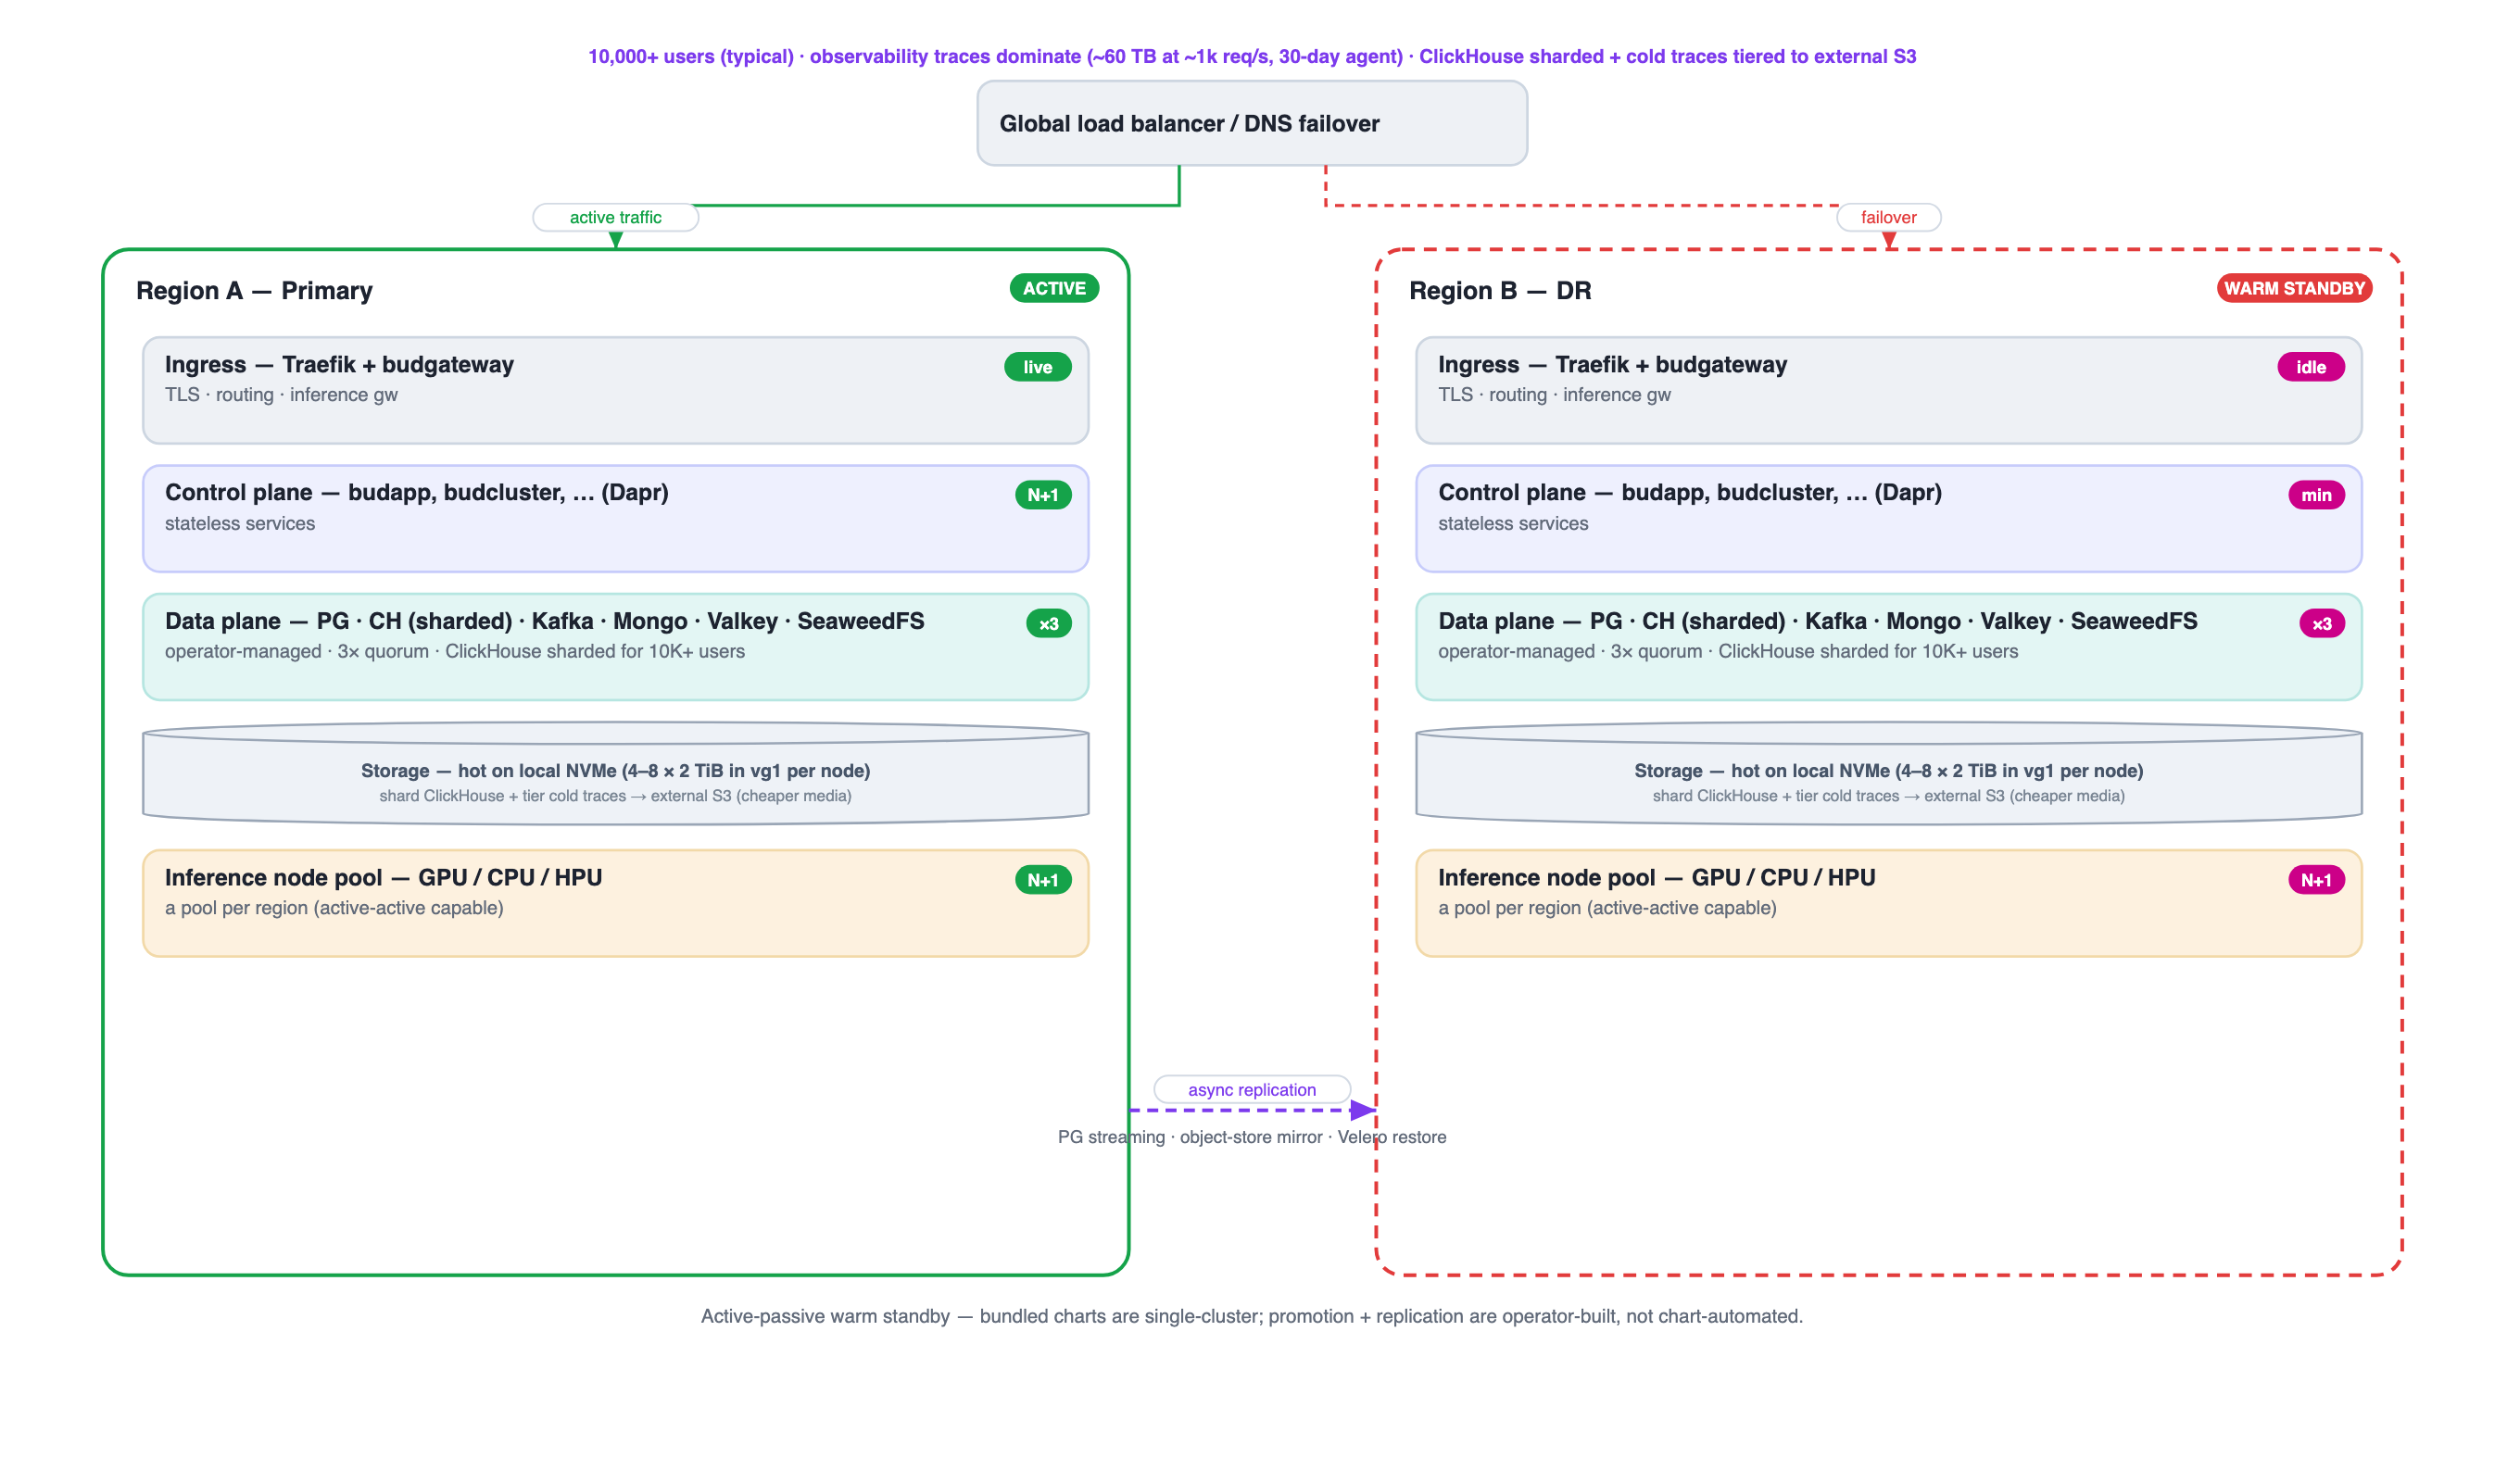
**Mission-critical, survives a region.** A second full cluster in another region,
active-passive warm standby, promoted on failover. The real premium is the
**second region** — availability, not user count.
| Resource | Bare minimum (\~3,000 concurrency, interpolated) |
| --------------- | ------------------------------------------------------------------------------------------- |
| Nodes | 3 (one per AZ) |
| CPU / memory | 72–144 vCPU / 192–384 GiB (same as T2) |
| Node NVMe | **\~12–14 TiB per node** (bigger NVMe, still 3 nodes) — or 14-day hot window + cold tiering |
| Object store | optional external MinIO for cold traces (\~15 TB raw) |
| Changes over T2 | multi-AZ node pool · `topologySpreadConstraints` by zone · offsite Velero |
`openebs-lvm` is **node-local** — a volume can't move zones. Quorum survives an
AZ loss, but synchronous cross-AZ replication carries inter-zone latency. Keep
zones in one low-latency region (≥10 Gbps), or relax Postgres to async and accept
a small RPO.
**Mission-critical, survives a region.** A second full cluster in another region,
active-passive warm standby, promoted on failover. The real premium is the
**second region** — availability, not user count.
 | Resource | Bare minimum (\~10,000 concurrency, per region) |
| ---------------- | ------------------------------------------------------------------------------------------------------------------- |
| Nodes | \~6–8 per region · **×2 regions** |
| CPU / memory | 128–192 vCPU / 384–512 GiB per region |
| Node NVMe | all-NVMe \~5–6 × \~24 TiB, **or** hot 3–5 × \~6 TiB + cold tiered out |
| Object store | **external MinIO \~50 TB raw** for cold traces + off-site DR copy |
| Deployment scope | bundled charts are single-cluster; cross-region replication + promotion are **operator-built**, not chart-automated |
## Sizing the storage — the bare-minimum volume math
The dominant, variable storage driver is **observability traces**, and it scales with
**throughput × retention**, not the tier. Total storage is the sum of four components —
don't size on traces alone:
| Component | Scales with | Rough size |
| ------------------------------------------------------------------- | --------------------------------- | ------------------------ |
| Platform baseline (queue, object-store metadata, working set) | \~fixed | \~200–500 GiB |
| Database working set (PG · ClickHouse hot · Kafka · Mongo · Valkey) | throughput | \~1.5–3 TiB (node-local) |
| **Analytics / observability traces** — the dominant term | **req/s × spans × retention × 3** | see below |
| Model registry | **model catalog**, not the tier | 50 GiB → 2–5 TiB+ |
### From concurrency to terabytes
`req/s = concurrency ÷ avg request seconds`. An agent request runs \~15 s
(multi-step), so 1,000 concurrent users ≈ 67 req/s. Use your own measured
request duration if it differs.
`TB ≈ (spans/req × 385 B × req/s × 86,400 × retention-days × 3 (replicas) × 1.3 (merge)) ÷ 10¹²`
(the ÷ 10¹² converts bytes to TB).
Agent invocations average \~15 spans/req; traces are \~90% of per-request storage.
**Baseline (agent workload, \~15 s/request, 90-day traces, ×3):**
| Concurrency | ≈ req/s | Trace volume (×3) |
| ----------- | ------- | ----------------- |
| \~100 | \~7 | \~1 TB |
| \~1,000 | \~67 | \~12 TB |
| \~3,000 | \~200 | \~36 TB |
| \~10,000 | \~667 | \~120 TB |
Sized for the **agent workload** (\~15 s/request, \~15 spans). The two levers that move
these numbers most are the **retention window** (linear) and **spans per request**
(fewer spans → proportionally less) — see the knobs below. Plug your own measured
request duration and span count into the formula for an exact figure.
## What the "external object store" actually is
Bud reaches object storage through a plain **S3 API** (`externalServices.s3`:
endpoint + keys + bucket). **By default it's SeaweedFS, in-cluster** — running on the
same nodes' NVMe, so there is *no* external store until you add one. The "external"
store is simply **a separate S3-compatible object store you stand up and operate
yourself**, then point that config at:
* **Self-hosted MinIO** (most common on-prem) — a small cluster of **cheap-disk nodes**
(HDD / standard-SSD, erasure-coded ≈ 1.5× raw). Bud ships an optional in-cluster
MinIO toggle, or you run it separately.
* **Ceph / RADOS-GW** — if you already run Ceph, its object gateway works too.
* **Cloud bucket** (AWS S3 / Azure Blob) — only where the deployment isn't air-gapped.
It is **additional infrastructure to provision and operate** — more (cheaper) nodes,
not magic and not free. It exists to hold the **cold analytics tier** and off-site
backups on inexpensive media, away from premium NVMe.
Cold-tiering ClickHouse to an external store is **operator-configured** (a ClickHouse
`storage_policy` plus you provisioning the store) — not a Bud default flag. And the
inference model volume is **not** shared storage: Bud pulls model weights from
SeaweedFS to **node-local** disk (`VOLUME_TYPE=local`), so no NFS/CephFS is required
on the model path.
## Scaling up or down — the knobs
| Lever | Effect | How to turn it |
| --------------------- | ----------------------------------------------------- | ------------------------------------------------------------------------------------- |
| **Retention window** | Linear — 30-day is ⅓ of 90-day | The biggest lever. Shorten trace retention (default 30-day traces / 90-day metadata). |
| **Request duration** | Inverse — shorter requests = more req/s = more traces | Set by your workload; measure it. The baseline assumes \~15 s agent requests. |
| **Spans / request** | Linear — fewer spans, proportionally less storage | Enable span sampling; keep only the orchestration spans you need. |
| **Per-node NVMe** | `nodes = volume ÷ per-node disk` | Stack more NVMe into `vg1` (8 / 16 / 24 TB) **before** adding nodes. |
| **Model catalog** | Sets registry size independently | Prune stale variants; size the registry volume to your model list. |
| **Content logging** | +\~2–3 KB per content-bearing span | Off by default. If on, bound it with a short retention window. |
| **CPU / concurrency** | CPU is the binding resource for agent/event load | Size vCPU to peak req/s; add nodes/HPA for throughput (memory rarely the limit). |
Through **T3 you stay at the 3-node HA floor** — you scale by fitting **bigger NVMe
into each node's `vg1` pool**, *not* by adding nodes. Only at **T4** does trace volume
start to drive node count. And even at T4 you *can* stay all-NVMe (\~5–6 big-NVMe
nodes) — you tier cold traces to external object storage to **save cost**, not because
it won't fit.
## Next steps
The underlying compute, memory, storage, and inference capacity model
Configure resources, retention, replicas, and the S3 endpoint
| Resource | Bare minimum (\~10,000 concurrency, per region) |
| ---------------- | ------------------------------------------------------------------------------------------------------------------- |
| Nodes | \~6–8 per region · **×2 regions** |
| CPU / memory | 128–192 vCPU / 384–512 GiB per region |
| Node NVMe | all-NVMe \~5–6 × \~24 TiB, **or** hot 3–5 × \~6 TiB + cold tiered out |
| Object store | **external MinIO \~50 TB raw** for cold traces + off-site DR copy |
| Deployment scope | bundled charts are single-cluster; cross-region replication + promotion are **operator-built**, not chart-automated |
## Sizing the storage — the bare-minimum volume math
The dominant, variable storage driver is **observability traces**, and it scales with
**throughput × retention**, not the tier. Total storage is the sum of four components —
don't size on traces alone:
| Component | Scales with | Rough size |
| ------------------------------------------------------------------- | --------------------------------- | ------------------------ |
| Platform baseline (queue, object-store metadata, working set) | \~fixed | \~200–500 GiB |
| Database working set (PG · ClickHouse hot · Kafka · Mongo · Valkey) | throughput | \~1.5–3 TiB (node-local) |
| **Analytics / observability traces** — the dominant term | **req/s × spans × retention × 3** | see below |
| Model registry | **model catalog**, not the tier | 50 GiB → 2–5 TiB+ |
### From concurrency to terabytes
`req/s = concurrency ÷ avg request seconds`. An agent request runs \~15 s
(multi-step), so 1,000 concurrent users ≈ 67 req/s. Use your own measured
request duration if it differs.
`TB ≈ (spans/req × 385 B × req/s × 86,400 × retention-days × 3 (replicas) × 1.3 (merge)) ÷ 10¹²`
(the ÷ 10¹² converts bytes to TB).
Agent invocations average \~15 spans/req; traces are \~90% of per-request storage.
**Baseline (agent workload, \~15 s/request, 90-day traces, ×3):**
| Concurrency | ≈ req/s | Trace volume (×3) |
| ----------- | ------- | ----------------- |
| \~100 | \~7 | \~1 TB |
| \~1,000 | \~67 | \~12 TB |
| \~3,000 | \~200 | \~36 TB |
| \~10,000 | \~667 | \~120 TB |
Sized for the **agent workload** (\~15 s/request, \~15 spans). The two levers that move
these numbers most are the **retention window** (linear) and **spans per request**
(fewer spans → proportionally less) — see the knobs below. Plug your own measured
request duration and span count into the formula for an exact figure.
## What the "external object store" actually is
Bud reaches object storage through a plain **S3 API** (`externalServices.s3`:
endpoint + keys + bucket). **By default it's SeaweedFS, in-cluster** — running on the
same nodes' NVMe, so there is *no* external store until you add one. The "external"
store is simply **a separate S3-compatible object store you stand up and operate
yourself**, then point that config at:
* **Self-hosted MinIO** (most common on-prem) — a small cluster of **cheap-disk nodes**
(HDD / standard-SSD, erasure-coded ≈ 1.5× raw). Bud ships an optional in-cluster
MinIO toggle, or you run it separately.
* **Ceph / RADOS-GW** — if you already run Ceph, its object gateway works too.
* **Cloud bucket** (AWS S3 / Azure Blob) — only where the deployment isn't air-gapped.
It is **additional infrastructure to provision and operate** — more (cheaper) nodes,
not magic and not free. It exists to hold the **cold analytics tier** and off-site
backups on inexpensive media, away from premium NVMe.
Cold-tiering ClickHouse to an external store is **operator-configured** (a ClickHouse
`storage_policy` plus you provisioning the store) — not a Bud default flag. And the
inference model volume is **not** shared storage: Bud pulls model weights from
SeaweedFS to **node-local** disk (`VOLUME_TYPE=local`), so no NFS/CephFS is required
on the model path.
## Scaling up or down — the knobs
| Lever | Effect | How to turn it |
| --------------------- | ----------------------------------------------------- | ------------------------------------------------------------------------------------- |
| **Retention window** | Linear — 30-day is ⅓ of 90-day | The biggest lever. Shorten trace retention (default 30-day traces / 90-day metadata). |
| **Request duration** | Inverse — shorter requests = more req/s = more traces | Set by your workload; measure it. The baseline assumes \~15 s agent requests. |
| **Spans / request** | Linear — fewer spans, proportionally less storage | Enable span sampling; keep only the orchestration spans you need. |
| **Per-node NVMe** | `nodes = volume ÷ per-node disk` | Stack more NVMe into `vg1` (8 / 16 / 24 TB) **before** adding nodes. |
| **Model catalog** | Sets registry size independently | Prune stale variants; size the registry volume to your model list. |
| **Content logging** | +\~2–3 KB per content-bearing span | Off by default. If on, bound it with a short retention window. |
| **CPU / concurrency** | CPU is the binding resource for agent/event load | Size vCPU to peak req/s; add nodes/HPA for throughput (memory rarely the limit). |
Through **T3 you stay at the 3-node HA floor** — you scale by fitting **bigger NVMe
into each node's `vg1` pool**, *not* by adding nodes. Only at **T4** does trace volume
start to drive node count. And even at T4 you *can* stay all-NVMe (\~5–6 big-NVMe
nodes) — you tier cold traces to external object storage to **save cost**, not because
it won't fit.
## Next steps
The underlying compute, memory, storage, and inference capacity model
Configure resources, retention, replicas, and the S3 endpoint